Good morning everyone,
I wanted to give an update on my play experiences with the new list and give some thoughts on a very unassuming gems we got in Theros.
I noticed when I got more games in that the deck was less explosive than I liked it to be. When the game gets to the endgame, it's even more resilient than before, but there have been much fewer explosive hands than before. I've been tweaking the deck to increase the number of cogs in the list, which has been paying off. I've added Lotus Petal back into the list and made a few other swaps, and it's been paying off. I'm also trying Dance of the Manse. 8ts been okay so far. Recursion at X=4 has not been as explosive as 4WW for all your artifacts, but I still want to play a few more games with it to see if the one-sided aspect of it is still worth it.
Second, I wanted to revisit bringing back an infinite back into the list that we had previously cut.
Soul-Guide Lantern is probably the best upgrade we have to the Tornod's crypt slot in the deck. It exiles all opponents graveyards. The next best option we have is nihil spellbomb because it draws cards, if we get into grindy gamestates.
Altar of the Brood looks really good right now, becauss we now have a way to exile all graveyards, regardless of how many opponents have eldrazi to shuffle them back in, and regardless of whether they have a graveyard removal spell to pop the Lantern in response to using it. We now have a way to one shot all graveyards at one time. In addition, if we simply recycle it, it will still do its job, albeit a bit slower, and keep dangerous targets out if the yard. I'm really liking this printing.
One of the biggest issues for me with the altar kill is that a well timed removal spell can remove our Crypt effect, essentially screwing one opponent out of the game but possibly setting up dangerously loades graveyards for your other opponents, and deck space is too tight to run 2 of these effects.
The lantern solves this issue.
The benefit to using altar in the kill is that it works much better within the Salvaging Station engine to fuel other artifact synergies, increases the artifact and cog count, and as such works within the other systems of engines and interactions in the deck.
How is everyone else feeling with their lists?
-

- Stefouch
- Registered User
-
Member for 8 years, 10 months, and 15 days
Last active Thu, Jun, 25 2020 16:28:49
- 0 Followers
- 148 Total Posts
- 12 Thanks
-
 Jan 25, 2020
1
Jostin123 posted a message on Sharuum, Everyone's Favorite KittyPosted in: Multiplayer Commander Decklists -
Nov 26, 2019
1
Jostin123 posted a message on Sharuum, Everyone's Favorite KittyHello everyone,Posted in: Multiplayer Commander Decklists
It's been a while but I am glad to say that I have built an update to my engine-based Sharuum list that feels very cohesive and has been doing better than anticipated.
Spells - 65
Creatures (13)
(3) Eldrazi Displacer
(3) Emry, Lurker of the Loch
(4) Phyrexian Metamorph
(4) Scaretiller
(3) Urza, Lord High Artificer
(5) Kudoltha Forgemaster
(5) Karn, Silver Golem
(6) Noxious Gearhulk
(6) Sharuum the Hegemon
(7) Emeria Shepherd
(7) Magister Sphinx
(7) Myr Battlephere
(8) Sphinx of the Steel Wind
Mana Rocks - 12
(0) Lion's Eye Diamond
(0) Lotus Bloom
(0) Mana Crypt
(0) Mana Vault
(0) Mox Diamond
(0) Mox Opal
(0) Mox Tantalite
(1) Sol Ring
(2) Grim Monolith
(3) Chromatic Lantern
(4) Thran Dynamo
(5) Gilded Lotus
Draw Effects - 7
(3) Thirst for Knowledge
(3) Timetwister
(3) Windfall
(4) Fast or Fiction
(4) Whispering Madness
(5) Memory Jar
(6) Echo of Eons
Tutors - 7
(1) Entomb
(1) Vampiric Tutor
(2) Artificer's Intuition
(2) Demonic Tutor
(2) Transmute Artifact
(3) Intuition
Cog-Based Utility - 8
(1) Aether Spellbomb
(1) Dispeller's Capsule
(1) Executioner's Capsule
(1) Expedition Map
(1) Nihil Spellbomb
(1) Sensei's Divining Top
(1) Voyager's Staff
(1) Wayfarer's Bauble
Non Cog Utility Artifacts - 10
(2) Sword of The Meek
(3) Crucible of Worlds
(3) Sculpting Steel
(4) Ghirrapur Orrey
(4) Unwinding Clock
Resource Conversion Engines- 7
(2) Thopter Foundry
(2) Time Sieve
(4) Clock of Omens
(4) Smothering Tithe
(4) Tawnos's Coffin
(4) Bolas's Citadel
(6) Salvaging Station
Spell-Based Recursion - 2
(5) Unburial Rites
(6) Open the Vaults
(7) Roar of Reclamation
Spell-Based Removal - 3
(2) Cyclonic Rift
(3) Bitter Ordeal
(3) Teferi's Protection
Lands - 35*
Artifact Lands (Cog Lands)- 4
Ancient Den
Darksteel Citadel
Seat of the Synod
Vault of Whispers
Fetch Lands - 4
Flooded Strand
Marsh Flats
Polluted Delta
Prismatic Vista
Fetch Land Targets - 14
Godless Shrine
Hollowed Fountain
Island x2
Mystic Sanctuary
Plains x2
Prairie Stream
Scrubland
Sunken Hollow
Swamp
Tundra
Underground Sea
Watery Grave
Utility Lands - 8
Academy Ruins
Buried Ruin
Geir-Reach Sanitarium
Ghost Quarter
Inventor's Fair
Mirokoku, Center of the Sea
Petrified Field
Strip Mine
Ramp Lands - 5
Ancient Tomb
City of Traitors
Crystal Vein
Gemstone Cavern
Mishra's Workshop
I was really struggling to shave parts of the engine list to make space for testing of the new toys that the deck could possibly use, which is why instead of tweaking it, I decided to do a complete rebuild of it. There are a lot of changes from the previous build so I am going to go through my decision process for this.
I don't know if people are aware of this, but manabases are the thing that usually make or break my want to pilot decks. I hate bad manabases, and I hate mana bases that are unpurposeful, and don;t provide meaningful cohesion for decklists. One of the reason I was drawn to Sharuum and it's original 75/25 ratios for colored cards to non-colored cards has been to take advantage of those ratios and cram as many useful spell lands into the list while still having good mana. that's also the reason why I tried not to deviate from the 50/50 ratio of artifacts to non-artifacts. To truly rebuild the list, I had to break my personal rules for these ratios, as so many new printings just don't allow the deck to continue to fall within those guidelines. The purpose of those guidelines was to keep the deck sufficiently colorless so the inclusion of so many utility lands wold not prevent the deck from being able to play its spells in a timely fashion. It is also a big reason why I chose to play signets over the talismans: it further allowed the deck to play with so many colorless lands. The signets also had a lot of play with the filter lands. It's how the deck could have only 1 land that produced colors in play and still make Esper mana at will.
Since I am running so many more colored spells, one big concession is that I would have to eliminate a sizeable chunk of utility lands and abandon the mana base that has supported the deck for so long. This makes using fetches and basics much more reasonable, and if that's the direction I'm taking the deck, I need the fetches and basics to do more than just color fix and thin. Running a healthy amount of basics allows me to run the check duals, which further allows me to play Mystic Sanctuary and enables me to fill a healthy number of plains to run Emeria Shepherd as a powerful recursion piece. These fetches also allow me to run Scaretiller and Wayfarer's Bauble as pieces that ramp lands, so I don't have to be as dependent on artifact ramp to get to my big mana spells. In particular, Scaretiller can allow the deck lines of play to Strip a land light opponent out of the game. The inclusion of Ghost Quarter over Wasteland is to allow me to search up basics in certain match-ups while still curbing the more broken lands out of other decks. It will take more time to see if this specific permutation of fetches and targets will need to be tuned further, but so far, it's been getting the job done.
Scaretiller: I spoke about the utility of this card. It really shines when paired with Clock of Omens or other tap / untap effects.
Eldrazi Displacer: It's a great blink effect and a colorless non-artifact, which in many game states is a plus.
Emry, Lurker of the Loch: I've really been impressed with this card. She's been a great compliment to Salvaging Station and Sharuum. She's been great at recurring artifacts that S.Station can't touch but you don't necessarily want to cast Sharuum to retrieve. She also brings so much more value to an unpaired Thopter Foundry (one without Sword of The Meek. She allows you to be able to play an inside-out recursion game with your artifacts. Emry really allows you to grind out games by making your graveyard a toolbox, not just a potentially game ending threat, when appropriate. Being able to play Noxious Gearhulk, sac it, and recast, is just amazing. Now, replace Gearhulk with Metamorph in your mind, and you start to see the upper echelon of what's possible. She's a great blink target for the deck alongside Sharuum and Scaretiller, and she almost always costs U. She's just fantastic.
Urza, Lord high Artificer: Yes, this card is bonkers, and he's been discussed in many threads including this one, so I won't rehash all the arguments. One thing that I will say is that he is particularly synergistic with many of the deck's slots, including some of the cogs. Lion's Eye Diamond, Aether Spellbomb, and Voyager's Staff are all examples of cards that can be tapped for mana and still used for their effects, which is nothing to sneeze at. The inclusion of Urza has pushed me to include both Clock of Omens and Unwinding Clock in this latest list, as you can now be tapped out and still make infinite thopters, or activate Artificer's Intuition.
Emeria Shepherd: She's a powerful 7 drop that is a beast of a recursion piece, and worth modifying the manabase to accommodate and use.
Wayfarer's Bauble: A new cog for the deck now that the manabase can accommodate it.
Thran Dynamo: Has been in and out of the list, usually interchangeable with Gilded Lotus. I'm now running it alongside Gilded Lotus to smooth out and bridge some of the new lines of play that have come up for Transmute Artifact, Clock of Omens, Eldrazi Displacer, and Sculpting Steel, and smooth out casting some of the higher cmc draw spells in the deck.
Echo of Eons: My previous Sharuum experiment showed that there was value in running wheels in the deck. Wheels are very powerful with Smothering Tithe and this one allows me to shuffle twister back into my library indefinitely. In a pinch, it can also serve as a one-time Elixir of Immortality when paired with Entomb or Intuition. Allowed me to fuse a card draw slot with the Elixir slot.
Ghirrapur Orrey: This is a card slot that I have to apologize for guys. I've always wanted to slot this into the deck and was never able to make it work, and this card is a perfect example of why you sometimes need to walk away from a problem to find your answers.
I have always had two fears about running this card. The first was not being able to empty my hand with the smattering of high cmc cards I can draw into. The second was that my opponents possibly taking advantage of my cards to pull ahead. I was always judging this card in isolation, and never really through through the lines of play that would make it viable. Playing fetch lands and strip effects raises the bard of utility on this, as Crucible allows you to use them multiple times a turn. However, Artificer's intuition can also let you tutor up your artifact lands to ramp, when your hand is land light. However, the big reason to run this is the Ancestral Recall on your upkeep. There is one card that we already run to great effect that would allow us to do this.
Lion's Eye Diamond
This was a huge oversight on my part, and quite honestly, I should have seen this much sooner. During the rebuild, there was a list of cards that I knew I wanted to try to run in the deck. On this short list was Smothering Tithe, Urza, Mystic Sanctuary, Scaretiller, Cyclonic Rift, and Teferi's Response. I was identifying my lines with Urza and looking at cards to cut to accommodate my wanted inclusions. Skullclamp was a card that I felt was under-performing as it required one too many pieces to get going for a draw engine. I was going over my play lines with Urza when I saw that L.E.D. could be tapped for U and still be popped to pitch your hand. That's when I went back to my binder to reread the card the card and smacked myself for not seeing it sooner. L.E.D. guarantees that you empty your hand to draw the 3 cards, and Salvaging Station, Emry, Eldrazi Displacer and Tawnos's Coffin (the latter two through Sharuum) guarantee that you can keep it going. This was a huge oversight on my part, and for that I apologize, as it most likely has stifled the furtherance and development of tech for Sharuum.
Bolas's Citadel: This card is just nuts and can help you build a dominant board state from nothing. You may not be able to go as deep as K'rrik or other Bolas Citadel decks, but you can easily build an insurmountable boardstate for 10 to 20 life. This card is as close to an auto-include as it gets. Also, the second ability is not to be underestimated, as you can just kill a table for blinking Magister's Sphinx a few times.
Cyclonic Rift / Teferi's Protection: Includes I wanted to make to keep up with the competitive arms race. I especially like Rift and it's applications with our wheel effects.
Mirokoku, Center of the Sea & Geir-Reach Sanitarium: I am running these cards as ways to force Smothering Tithe triggers to happen, and to clear cards off your library for Top. The fact Geir-Reach pitches Sharuum targets is a bonus.
I've gotten about 5 sessions of games in and I have to say the deck feels great. The deck does mulligan differently, as it the curve is different and the lines of play have changed, but it feels very solid.
-
Jul 7, 2019
1
Jostin123 posted a message on Sharuum, Everyone's Favorite KittyI've gone close to 4 years where I have not played Sharuum on a regular basis. Having been turned off by the lack of printings that directly affected the deck while other archetypes were getting exciting new pillars for their respective commanders.Posted in: Multiplayer Commander Decklists
It has been frustrating to see Sharuum's primary engines receive meaningful printing at a glacial pace while other commanders receive printing that felt they were customized specifically for them, and whose impact has taken those decks from a power level of a 4-5 to a power level of 8-9, seemingly overnight.
I have always said that when it comes to broken artifacts, WoTC tends to print them in 4-6 year cycles. It took a while, but there is finally a threshold or artifacts and artifact synergies to seriously revisit and bring meaningful change and improvements for the Sharuum engine-based deck.
In addition, there has been a bigger shift with the format overall. With Commander being the most successful format in Magic, WoTC has been tailoring printings every set specifically for the format, slotting most if those printings in the rare and mythic slot, and now as buy-a-box promos, to help sell packs and boxes along-side the needs of the competitive crowd.
This has created a shift in the format where decks are stronger, faster, and the majority of commanders now have pillars that are independent of one another. While commanders share format pillars, the cards that make one commander strategy tick are often different from ones that make another tick within the same archetype, now that sufficient printings have fine-tuned the specialized needs for most commanders. This means that the needs and pace for our engine-based deck has also changed. This is what has led me to revisit old tech while looking to evaluate newer cards within a wider scope.
I have finally been able to get a string of games together among different play groups, letting me first get a feel of what the deck needed/was missing, and what was underperforming.
I have recognized a few things about the format since I've begun playing commander more consistantly:
1) The pace of the format has sped up. With the constant stream of printings that are constantly breaking commanders, decks are becoming more proactive; game states are becoming more "answer now" and the windows of opportunity to respond to these game states are becoming smaller and smaller over time. I am finding that as a general rule, being proactive is strategically better than being reactionary.
2) I am finding that the prevalence of individual archetype staples has diversified and tapered off while format staples have consolidated across decks. Gone are the days where every deck susceptible to mill ran an Eldrazi legend for the shuffle effect, but conversely almost every deck that can support format staples (such as Cyclonic Rift, Paradox Engine, Protean Hulk and Teferi's protection) runs them. As such, part of winning the game is being able to shape the game to make these format staple cards as harmless as possible. The way you beat these staples is to force your opponent to play them to prevent him/her from losing as opposed to allowing your opponent the opportunity and time to weaponize these cards to solidify a win. This gameplan plays into the proactive tendencies the format is being pushed towards. It also changes the playstyle that the deck was previously built towards, which also changes the application and value of the slots in the deck.
I started by piloting the original list, which took quite a few lumps in those first games (it took a while to get the rust off, no pun intended). If you need to find the original list, it can be found here. After having played a solid number of games, I have finally settled on a direction strong and consistent enough to guide the deck towards.
Bolas's Citadel - I feel that Bolas's Citadel is a build-around card for this deck. As a cog-based deck, the life payment is negligible for almost half of our artifacts which are mana rocks or 0-1 cost artifacts. However, our deck makes the sacrifice ability very relevant. It plays very well with Magister's Sphinx, which resets and opponent's life to 10, where Bolas's Citadel just finishes the opponent from there. Sharuum has multiple ways to gain life, which allows us to get additional mileage out if the Citadel if needed.
Smothering Tithe - I've spoken about this card previously, but I'll reiterate my points:
It generates free artifact permanents for the deck, making it a "must answer". Tithe serves as ramp if played early, easies color requirements and has brutal synergizes with many cards in the deck.
For this update, I will be focusing on the synergies between Magister's Sphinx, Bolas's Citadel and Smothering Tithe as the compass guiding my decisions for the deck, as the synergies that branch between these 3 cards, and independent from these 3 cards, feel like a strong enough base to retune the deck's engines around. That is not to say this is the best course for updating and improving the deck... time will tell whether this is the case. I do feel though, that this is a solid foundation for moving forward with credible ideas for improving the deck.
Here is my latest Sharuum update:
Spells - 65
Creatures (10)
(4) Phyrexian Metamorph
(5) Kudoltha Forgemaster
(5) Karn, Silver Golem
(6) Sharuum the Hegemon
(6) Noxious Gearhulk (new)
(6) Steel Hellkite (revisited)
(6) Marionette Master (new)
(7) Magister Sphinx
(7) Myr Battlephere
(8) Sphinx of the Steel Wind
Mana Rocks - 14
Cog Mana Rocks - 8
(0) Lion's Eye Diamond
(0) Lotus Bloom
(0) Mana Crypt
(0) Mox Diamond
(0) Mox Tantalite (new)
(0) Mox Opal
(0) Mana Vault
(1) Sol Ring
Non- Cog Rocks - 6
(2) Azorius Signet
(2) Dimir Signet
(2) Grim Monolith
(2) Orzhov Signet (revisited)
(3) Coalition Relic (revisited)
(5) Gilded Lotus
Draw Effects - 6
(3) Day's Undoing (new)
(3) Timetwister
(3) Windfall
(4) Whispering Madness
(5) Memory Jar
(6) Time Spiral (revisited)
Tutors - 6
(1) Entomb
(1) Vampiric Tutor
(2) Artificer's Intuition
(2) Demonic Tutor
(2) Transmute Artifact
(3) Intuition
Cog-Based Utility - 10
(0) Tormod's Crypt
(1) Aether Spellbomb
(1) Altar of the Brood (revisited)
(1) Dispeller's Capsule
(1) Executioner's Capsule
(1) Expedition Map
(1) Nihil Spellbomb (revisited)
(1) Sensei's Divining Top
(1) Skullclamp
(1) Voyager's Staff
Additional Utility Artifacts - 3
(2) Sword of The Meek
(3) Crucible of Worlds
(3) Ensnaring Bridge (revisited)
Resource Conversion Engines- 8
(2) Thopter Foundry
(2) Time Sieve
(4) Clock of Omens (revisited)
(4) Smothering Tithe (new)
(4) Tawnos's Coffin
(4) Trading Post
(6) Bolas's Citadel (new)
(6) Salvaging Station
Spell-Based Recursion - 3
(5) Unburial Rites
(6) Open the Vaults
(7) Roar of Reclamation
Spell-Based Removal - 3
(2) Cyclonic Rift (new)
(3) Bitter Ordeal (revisited)
(7) All is Dust
Planeswalkers - 2
(5) Tezerret the Seeker
(7) Ugin, the Spirit Dragon
Lands - 35
5-Color Lands- 6
City of Brass
Command Tower
Mana Confluence
Reflecting Pool
Spire of Industry
Tarnished Citadel
Artifact Lands (Cog Lands)- 4
Ancient Den
Darksteel Citadel
Seat of the Synod
Vault of Whispers
Fetch Engine - 9
Flooded Strand
Godless Shrine
Hallowed Fountain
Marsh Flats
Polluted Delta
Scrubland
Tundra
Underground Sea
Watery Grave
Filter Lands - 3
Fetid Heath
Mystic Gate
Sunken Ruins
Utility Lands - 9
Academy Ruins
Buried Ruin
Cavern of Souls
Emergence Zone (new)
Geir-Reach Sanitarium (should be Bazaar)
Blast Zone
Inventor's Fair
Strip Mine
Mirror Pool (revisited)
Ramp Lands - 5
Ancient Tomb -f
City of Traitors
Crystal Vein
Gemstone Cavern -f
Mishra's Workshop
Salvaging the Station Engine: I've needed to reevaluate the engine Components, consolidate what I could and get rid off what was no longer necessary.
Mox Tantalite - Strict upgrade to Lotus Petal, which was the weakest mana rock in the list. Mox Tantalite is now the third mana rock that can combo with Karn, Silver Golem and Salvaging Station to create infinite death triggers for the deck.
Altar of the Brood - With the popularity and revitalization of library based combo strategies (Protean Hulk, Zur, Arcum, Yisan, and now Prime Speaker Vannifar) I chose Altar as an easily tutorable way to threaten an infinite (via mill) while being very serviceable in breaking up opposing infinite combos. As it increased the lethality of graveyard based decks, I've added a second graveyard hate piece in Nihil Spellbomb to compensate.
Elixir of Immortality - Was cut as the deck is no longer looking to prolong games to outgrind the opponent. As such, using Elixir to protect specific combo pieces from timely graveyard hate is a bridge too far and so it's been cut.
Voltaic Key - This one was a tough cut. It's a cog and so it plugs in with the engine, but like Venser, a one time untap doesn't do enough for enough games, and so it has been cut for Clock of Omens, which has been putting in more work.
Recoupling Combo Engines:
Thopter / Sword Combo - Generates life and permanents for Bolas's Citadel, and still can fog combat steps and threaten life totals with enough mana.
Time Sieve - Can generate free turns via Smothering Tithe, plugs into Thopter/Sword combo to end games, great lightning rod for targeted artifact hate.
Clock of Omens - Creates tons of mana with Smothering Tithe without losing the treasure, helps Salvaging Station and Tawnos's coffing blink creatures multiple times in a turn
Tawnos's Coffin - Still amazing at rebuilding your board with your commander, blinkable creature suite has been tweaked to work better with Citadel
Trading Post - Smothering Tithe created the mana and fodder to make TP more efficient, gets better with Clock of Omens
Salvaging Station - Still amazing at generating permanents for the deck, and recycling utility permanents to disrupt opponents. Cogs used for the engine are easy to play via Citadel and Station helps rebuy those permanents.
Cultivating the Draw Engine:
With the focus on Smothering Tithe, I am choosing to use Draw 7s as my defacto card advantage spells. Smothering Tithe will grow me free lotus petals, while Clock of Omens allows me to empty my hand if I have a few mana rocks at my disposal. Additionally, overlapping multiple twister effects will help in protecting my graveyard from incidental hate. The spellbombs go a long way with the draw 7s as they will tuck whatever they hit back into that player's library, where it is harder for most decks to access, and the synergy between them and Cyclonic Rift is too good to pass up. So far, these options have been mostly better: there have been times where I've missed the binning effect of cards like Thirst for Knowledge and Fact or Fiction, but the benefits have been very good.
Toy Soldiers: The creature suite in the deck has also been modified to plug into the value engines and game plan of the deck. I have now gone to 10 creatures in the deck.
Phyrexian Metamorph - The all-star if the deck, metamorph plays star roles in multiple engines, while also doubling as my opponent's best artifact ir creature, Magister Sphinx #2 or another jet in the airforce plan.
Kudoltha Forgemaster - Smothering Tithe makes free sac fodder for him, and he helps Tutor for the other half of many of your engine pieces. Super strong.
Karn, Silver Golem - Everything discussed in the Karn clinic is still relevant today. We can now include "efficiently destroys treasure" to that section.
Noxious Gearhulk - Replaces duplicant in this slot. The life gain is helpful in a pinch. Menace can also close out close games
Steel Hellkite - Helps contain boards which has become increasingly important now that treasure is so easy to come by.
Marionette Master - Older card that's gotten a new look. Marionette Master creates free permanents for Bolas's Citadel, but the counters can also drain opposing life totals with Citadel. Citadel sacrificing 10 artifacts with a Marionette Master on the table with 3 +1/+1 counters will drain a player for 40. Also remember, Tawnos's coffing can not only create more servos, it can also force Marionette Master to accumulate additional +1/+1 counters.
Myr Battlephere - Efficiently makes artifact permanents for Citadel and can threaten to kill anyone Magister Sphinx has sneezed at. Due to updated damage rules, you can no longer swing at a player/planeswalker and burn out a second planeswalker with the triggered damage: it all goes to the attacked player / permenant.
Sphinx of the Steel Wind - For those times when a games devolves into a dragged-knuckle, no-holds barred, on-board fist fight, accept no substitutes.
What's been cut:
Mind's Eye - Because the faster pace of the format and the increased number of "must answer" cards, it is dangerous to sit back and rely on stalling out your opponent's turns to refill your hand. As such, I've pulled Mind's Eye from the list for more effective cards.
Venser, the Sojourner - Venser's main use was to blink permanents, which worked great with Sharuum, but more commonly, allowed you to untap your tapped mana rocks, especially those that dont untap as usual. The minus ability was also great when you've has the time to create an army of thopters to kill a player. We don't have the time to make the second ability useful, and a one-time blink ability isnt impactful enough, so it's also cheering the deck on from the sidelines.
Karn Liberated - Has since been replaced by Ugin, which is a much better sweeper, and has a more relevant ultimate.
Tezzeret, Agent of Bolas - Due to the changes in deck construction, this Tez doesn't hit enough of your bombs consistently enough to warrant the slot. Also, since we run fewer planeswalkers, it's less relevant to make the 5/5 body to protect them. It's still a solid card, and I can definately see it making it's way back into the deck if some new printings allow us to make a multiple minor tweaks to the deck.
Rings of Brighthearth - Rings is a card that allowed our loop engines to be kicked into overdrive. For that to happen, we needed time to pair it with those engines and abilities. It gave additional value to our value engines. With the amount of efficient artifact hate available, we dont have the time to sit back and milk Rings for value. As such, it's taking a back seat to better utility cards for now.
-
 Oct 30, 2016
2
Guerte posted a message on Breya: Doomsday ArtificerPosted in: Multiplayer Commander Decklists
Table of Contents
Introduction

I'm going to start this introduction by being completely honest. When Commander 2016 was fully spoiled, I was a bit disappointed with the set. You may ask yourself, “Why would anybody be disappointed with this set? A lot of people were wanting four-color commanders to be playable.” My reasoning was simple: I was looking for new cards to put into my current decks, and wasn't going to be bothered by trying to build a new one. That is, until I stumbled onto one card: Breya, Etherium Shaper.
I'm a sucker for artifact decks. I played Affinity in Modern, and enjoyed it so much, I foiled out the whole deck. I got hardcore into Commander, so I built and foiled out Daretti. Now, I have built Breya and she may be more busted than my Daretti deck.
Other Possible Commanders:Why play Breya?
The first think everyone needs to realize is Breya is a machine gun and the deck is the ammo. What exactly does that mean? She is a win condition in the Command Zone. Let's break her card down: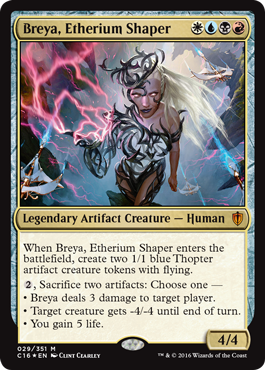
Cost:
Breya costs WUBR. This can be quite difficult to achieve as the more colors in your commander, generally they are more difficult to cast. What's great about these colors is that she has the best colors for counters, tutors, and removal of all sorts. That is a pretty powerful thing in and of itself.
Power/Toughness:
Breya is a 4/4 for 4 mana. Not bad as far as stats go but is pretty generic for that cost. This isn't something to really write about, but her abilities are where her stats get really good.
Abilities:
Breya's first ability creates two 1/1 blue Thopter creature tokens. Altogether, that's 6 power/toughness spread across three bodies for only four mana. That makes it even better!
Her activated abilities all cost 2 and two artifacts to be sacrificed, and you get one of three options:
- Her first ability lets you Lightning Bolt someone in the face.
- Her second ability is Grasp of Darkness
- Her third ability is a Whitesun's Passage
What's that? She GIVES you two artifacts to sacrifice to herself? THAT'S ABSURD! Add infinite mana and a select few cards, and you can wipe the entire board of creatures, gain infinite life, or just get straight to it and kill everyone at the table.
While we can specifically focus on Breya's abilities and build the deck around that, that's not what we are doing here. While using her as a win condition is included in the deck, we are also using her for her colors.
You might like Breya if:
1) You like playing powerful decks capable of winning in the first few turns.
2) You like infinite combos.
3) WUBR are your favorite colors of that Magic pie.
You might dislike Breya if:
1) You enjoy long, grueling games with tons of interaction.
2) You would rather turn creatures sideways and win through combat.
3) You want your deck to fully take advantage of your Commander, and not just use them for the colors.
When considering other Commanders over Breya, the thing that everyone should understand is there are multiple ways to build her. I chose to build her as a Doomsday/Ad Nauseam deck that utilizes those cards to get into a combo for a quick win. Others may want to build her as an artifact-centered deck. Either way to build her is fine, so I will list a couple other Commanders that fall into those categories and are still in our colors. Those Commanders are:
Artifact-Centered Commanders:
Sharuum the Hegemon: Sharuum is the original Esper artifact Commander. She is a combo piece sitting in the Command Zone waiting to be abused. She utilizes other artifacts such as Sculpting Steel/Phyrexian Metamorph to continuously swapping herself and that artifact to create infinite triggers with Disciple of the Vault or infinite Gravestorm with Bitter Ordeal to secure a win.
Daretti, Scrap Savant: A newer Artifact-matters Commander, and a personal favorite of mine. Losing out on Esper colors is a negative for running him as you lose out on tutors and counters, but he makes up for it by having a more consistent mana base and allowing you to filter through your hand and deck to find answers or a way to win. Also utilizes the graveyard as a second hand, allowing you an abundance of options for any situation.Doomsday Commanders:
Zur the Enchanter: When people think of Doomsday in Commander, the usually will associate it with Zur, as he, in my opinion, is THE DEFINITIVE Doomsday Commander. The deck utilizes a low curve and plenty of tutors to either grab Doomsday itself, or goes for Ad Nauseam to fill the hand and put out a lot of mana to combo off.
Jeleva, Nephalia's Scourge: This Commander is more associated with Storm decks. While it does run the same Doomsday/Ad Nauseam cards and will use the same piles, or at least similar piles, it also utilizes the Storm mechanic to pull out a win with Tendrils of Agony or the new Aetherflux Reservoir
Deck History
The deck has gone through quite the changes over the time that I've played it. Breya is a vary versatile commander, not only for her abilities, but also for her colors.
The first iteration of the deck was basically an artifact "good stuff" deck with Gearhulks, big bad artifacts, and all the combos I could find, including Sharuum the Hegemon combos. The deck was clunky and unreliable.
The second iteration took out the clunky good stuff and focused on infinite combos. This still was too clunky. Having pieces to multiple combos that don't work together is not a good thing. Back to the drawing board.
The third iteration saw me cut all the "I win" combos, like Sharuum the Hegemon, Sculpting Steel, and Disciple of the Vault, to focus on making infinite mana and using Breya as the win condition. To protect the combo, I added in more removal and a counter package to fill in the voids.
After much more playtesting, I came to the realization that Nim Deathmantle/Eldrazi Displacer + Krark-Clan Ironworks is way too slow and mana-intensive to allow for fast wins. The Bomberman combo is fast enough, but for it to be faster, we needed to be able to get him into play faster, so being able to reanimate him for a much cheaper cost is the ideal way of doing so. Since we are playing reanimation spells to bring Salvagers back, why not use them to bring Worldgorger Dragon back as well? So, I decided to drop the Deathmantle/Displacer combos for the much faster George combo and other spells to facilitate it, but it still took a while to get into the combo. Enter Doomsday. This single card allows us to stack our deck with whatever combo we need to win, and can either win the same turn, or the very next one, if left uninterrupted. And if we're playing Doomsday, you may as well throw in LabMan to give you another option that isn't graveyard-reliant.
Now, we are on to the fifth iteration of the deck. I dropped the George combo, as I felt it was too fragile and easily disrupted. Once disrupted, we would have no choice but to concede, as there is no coming back from that. So, I added in Demonic Consultation and a few other cards to dive deeper into LabMan/Doomsday combos.
This is the deck I bring to you today. So, without further ado, let us get into it and check the deck out.
The Deck
Card Analysis
While there are many options for cards that could be included in a deck, there are only room for 100. In the spoiler below, I will give a card-by-card explanation as to why I specifically chose to have a certain card in in the deck.
Creatures:
Dark Confidant: Drawing extra cards in any format is a powerful thing. Drawing extra cards for free is even better. Confidant has the downside of hurting us if we draw anything above 1 CMC, but as our curve is low, it shouldn’t hurt us too much.
Grand Abolisher: Being able to protect our combo is essential. Abolisher does this like no other. Shutting out anything our opponent’s do on our turn is amazing and beneficial to us. The bonus of him being a Human makes him uncounterable with Cavern of Souls, since that is what we will always name since Breya is also Human.
Jace, Vryn's Prodigy: Helps us dig deeper into our deck. When he transforms, he gives us access to our graveyard in case there is a counter spell in there to protect us when we try to combo off.
Laboratory Maniac: One of the win conditions of the deck. He is part of the Doomsday “combo” and is one of the ways we win with said combo.
Auriok Salvagers: The first half of the "Bomberman Combo." This card goes infinite mana of any color with Lion's Eye Diamond. Can also be used to return a small artifact as well.
Notion Thief: This guy will prevent other players from drawing extra cards and allow us to draw them. Depending on how many cards are being drawn and the number left in the library, it is possible to win a game if you have LabMan out with this guy. Can also empty out other players’ hands when using a Wheel effect.
Artifacts:
Chrome Mox, Lotus Petal, Mana Crypt, Mox Diamond, Mox Opal, Mana Vault, Sol Ring, Dimir Signet, Fellwar Stone, Grim Monolith, Talisman of Dominance: The mana rocks. These accelerate our mana and allow us to cast our bigger spells earlier, or numerous spells in a turn.
Lion's Eye Diamond: The second half of the "Bomberman Combo." Its effect is a mana ability, so it doesn't use the stack, so when you activate it, you will lose your hand immediately. Caution is required when playing the card. Having a way to protect your combo via Silence/Grand Abolisher or a counter will help ensure you go off without a hitch.
Sensei's Divining Top: Filters through the top three cards to smooth out our draws. It’s a Commander staple and should be in most, if not all decks just because of the value it gives. Can also help facilitate the Doomsday combo.
Isochron Scepter: The main purpose of Scepter is to be used in conjunction with Dramatic Reversal, Aetherflux Reservoir, and mana rocks that produce at least 2 to facilitate a storm win. If one of your mana rocks can produce all colors as well, can also win via Breya herself.
Aetherflux Reservoir: Storm win condition. Mainly used in conjunction with Isochron Scepter/Dramatic Reversal and mana rocks to continuously gain life in order to one-shot each opponent.
Sorceries:
Faithless Looting: We tend to go through cards in our hand quite fast, so we need ways to refill. Filters our hand and gets rid of stuff we don't need.
Gamble: We need tutors to search for our combo pieces, counters, and removal, and even sometimes for that vital land drop. It can come back to bite us by discarding what we tutored for, or another card we wanted to keep, but that’s why it’s called Gamble. It’s another low-cost tutor that is needed for the deck.
Gitaxian Probe, Ponder, Preordain: Our one mana draw spells. Having one of these cards in hand after casting Doomsday can help us combo off in the same turn.
Imperial Seal: Sorcery speed Vampiric Tutor. Having access to a tutor on turn one is powerful. Sets up plays for the following turn.
Vandalblast: Gets rid of a single problematic artifact, or for its overload cost, it can be a artifact board wipe for our opponents.
Winds of Change, Wheel of Fortune, Windfall: These cards help refill our hand when we empty them. Can also be used in conjunction with Notion Thief to empty everyone else’s hands and fill ours up even more.
Demonic Tutor: Black staple card. Hands down the best tutor available. 1B to bring any card from your library to your hand is insane. Will either tutor up a combo piece, or some protection for us to combo off.
Merchant Scroll: Mainly used to tutor for Dramatic Reversal. Will also tutor up protection for comboing off.
Night's Whisper: Another draw spell. Can also be used in a Doomsday pile to help facilitate a win. Redundancy is never a bad thing.
Doomsday: The namesake card of the deck. This single card wins games. Use this spell to stack your deck in multiple ways to set up your combo for next turn, or the very same turn if you have the mana/cards to do so. Very powerful card to have, but also a very difficult card to use.
Yawgmoth's Will: Allows us to play our graveyard like a second hand, but just for the turn. Useful for when our combo pieces get countered/destroyed as it will allow us to replay them. Be cautious when using this, as ANY card that gets put into the graveyard will be exiled, not just the ones you play from the graveyard.
Instants:
Pact of Negation, Dispel, Flusterstorm, Mental Misstep, Pyroblast, Spell Pierce, Swan Song, Counterspell, Delay, Mana Drain, Force of Will: Our counter package. While they can be used to counter problematic cards, their focus is to protect our combo when trying to win.
Angel's Grace: Mainly used in combination with Ad Nauseam to get our deck in our hands. Can also save us from losing when in a pinch.
Brainstorm: Draw three for a single mana is good, even if you must put two back. You can put cards you don’t need on top, and then use a fetchland to send them on their way. Can also help facilitate the Doomsday combo.
Chain of Vapor: Removes any problematic permanent so we can combo off. Be cautious when using this card, as it can also bite us back and stop us from winning on the same turn.
Dark Ritual: Mana accelerant. Helpful to get BBB for Doomsday or Necropotence, but can also be used to cast an Ad Nauseam earlier in the game.
Demonic Consultation: One of the new pieces that we are trying out in the deck. This combined with LabMan and a cantrip is game over for everyone else.
Enlightened Tutor, Mystical Tutor, Vampiric Tutor: Instant speed tutors. Will usually tutor up a combo piece but can also tutor up protection if we have the combo in hand.
Silence: Shuts our opponent’s out during our turn so we can combo off unhindered.
Swords to Plowshares: Low cost removal when we need it. One of the best pieces of removal in the game.
Thought Scour: Part of the Doomsday pile. This card alone puts what we need in the graveyard and grabs us the next piece to continue the combo.
Cabal Ritual: Another mana accelerant that produces BBB. With Threshold, it produces BBBBB, which is the exact amount we need to cast Ad Nauseam.
Cyclonic Rift: Can take care of a single problem that is keeping you from comboing off, or if you have the mana, return everyone else's permanents to hand and not have to worry about them for a turn or two.
Dramatic Reversal: Used with Isochron Scepter to facilitate infinite mana and help us with a Storm win via Aetherflux Reservoir.
Izzet Charm: An all-in-one spell. Helps protect our combo, filters our hand, and can remove a creature if need be.
Lim-Dul's Vault: A tutor card of sorts. Let's us take a look at five cards at a time and stack them how we want. If we don't like those five, we pay 1 life and try again. Used to help set up our win.
Predict: A cantrip that is mainly used in a specific Doomsday pile.
Tainted Pact: Another avenue for victory with LabMan, we can use it to go through our deck to find the last piece of our combo.
Frantic Search: Part of the Doomsday pile. Essentially it is a free spell if it resolves, and we will usually cast LabMan right after.
Thirst for Knowledge: Draw spell that lets us draw three cards but will have to discard 2 cards or one artifact.
Ad Nauseam: Our mass draw spell. Our curve is low, so we shouldn't lose too much life. Best to use at end of opponent's turn just before ours as we can draw a boat load of cards, start our turn with more than a full grip, and most likely combo off.
Gush: A "free" draw spell. Another piece used in conjunction with our Doomsday piles.
Enchantments:
Mystic Remora: Early game draw source. Can be used later in the game but loses its effectiveness when others can pay the extra four.
Necropotence: Card draw is important, and Necropotence is probably the best at doing that. We can fill our hand back to 7 or draw more to dig deeper for combo pieces. Once we get this down, we will usually want to pay 10 life at a minimum to shape our hand and hopefully combo off the following turn.
Lands:
Aether Hub, City of Brass, Command Tower, Exotic Orchard, Forbidden Orchard, Mana Confluence, Reflecting Pool: Rainbow lands that produce all four of our colors. These are essential, as we may need multiple colors to facilitate our combos but may only need a few lands in order to combo off.
Ancient Tomb: This land taps for 2 colorless mana at the cost of two life. Being able to cast our spells a turn earlier is a powerful thing to do in any format.
Arid Mesa, Bloodstained Mire, Flooded Strand, Marsh Flats, Misty Rainforest, Polluted Delta, Scalding Tarn, Verdant Catacombs, Windswept Heath, Wooded Foothills: Being four colors means our mana is going to be awkward. We run all 10 fetches to help fix our colors and get the ones we need when we need them.
Badlands, Plateau, Scrubland, Tundra, Underground Sea, Volcanic Island: All 6 ABUR duals are ran so we can have untapped mana that can produce all our colors.
Cavern of Souls: Breya is one of our win condition in the deck, so we need to make sure she hits the battlefield when we cast her. Produces our colors so we only need to produce 3 of the other colors alongside this land. Also, it's beneficial that all of the creatures we run are also Humans.
Darkslick Shores/Spirebluff Canal: Fast lands for early game color fixing. These both make the most important color, U, and Darkslick will make the second most important, B.
Urborg, Tomb of Yawgmoth: Doomsday and Necropotence both cost BBB, so this land will help make casting it easier without having the need for exactly three Swamps on the field.
Strategy

The strategy for this deck, much like any Doomsday/Ad Nauseam/combo deck, is straight forward: get your combo and win as fast as possible. How do we go about doing that? Our deck runs a plethora of tutors that can find us our first combo piece to get a game plan in motion, or it can find the other half to the combo in our hand. We also need to assess the other Commanders/board state to see if it’s possible to combo off as early as possible, or if some sort of protection will be needed. Each phase of the gameplay is important, so let’s take a closer look at them.
1) Mulligans: Mulligans are one of the most important things to master about this deck. You need to know what hands are good, which are bad, and which ones are manageable enough for the long game. When deciding whether to take a mulligan or not, you need to keep in mind the following things:
- Minimum of 2 Lands: We need at least two lands to cast our spells. Within those two lands, we need to be able to make at least U and B, as those are our two most important colors. We would also like both of those to be Islands as well, as they will help facilitate a Gush/Doomsday pile.
- Mana Acceleration: Whether this is mana rocks, or Dark Ritual/Cabal Ritual, we would like to see some kind of ramp in our opening hand, that way we can move the game state forward by caster more/bigger spells earlier in the game. Being able to cast Ad Nauseam within the first few turns will usually mean the end of the game soon.
- Combo Piece/Tutor: We want to see one of these things in our opening hand. Having one of these will essentially decide our lines of play for the game. With an exact combo piece such as Lion’s Eye Diamond, or even Doomsday, we have an exact road to winning the game, so we should follow that. If we only have a tutor card, we can assess the board/players, and decide which combo would be most effective to take.
2) Early Game: The early game is where we deploy our lands and mana rocks. We develop our hand for a combo by tutoring the pieces we need or drawing into them naturally. We don’t want to give too much information out this early in the game, so if possible, use tutors that don’t make you reveal what you search for, such as Imperial Seal, Vampiric Tutor, or Demonic Tutor. We also continuously monitor the board state and the other players. We want to know what decks they are playing, any possible disruption they may have, and whether they can combo before us.
If we were lucky and drew a “perfect hand,” we can attempt to combo off on Turn 1 or 2. What are some of the combos that allow for Turn 1 or 2 wins? Here are just a couple examples:
Turn 1 Win:
Hand: Any land that produces W, Auriok Salvagers, Lion’s Eye Diamond, Mana Crypt, Sol Ring/Mana Vault
This allows for a Turn 1 Bomberman combo. Having Pact of Negation would help protect you from a Force of Will as well.
========================================
Hand: Underground Sea or another black source, Dark Ritual, Doomsday, Lion's Eye Diamond, Gitaxian Probe
This spectacular hand will allow you to have a Turn 1 Doomsday win.
I will discuss both wins in further detail below in the Combos and Doomsday Piles sections below.
Those hands are basically “Magic Christmas Land,” but the possibilities are there, and knowing what kind of lines of play you are able to take will help you decide which is going to be the best and most efficient way of winning. You may not be able to get these on turn 1 or 2, but it is possible to do them even on 3 or 4.
3) Mid Game: If we are unable to get one of those “Magic Christmas Land” opening hands and win within the first few turns, then we move on into the mid game. In this phase of gameplay, we are still on the hunt for our combo pieces or protection (whichever we are at the time lacking), and still keeping an eye on the boardstate. We need to keep track of everyone’s life totals, cards in hand, number of untapped lands, and what is physically on the battlefield. If we think we can combo off if the opportunity arises, then we can do so. Otherwise, play the slow game and bring out Breya for some small beats or chump blocks.
4) Late Game: With the way the deck is build, we should never get to a late game, as that is when we are at our worst. How do we get to this point? Not drawing any combo pieces or tutors, or we tried going for a combo and it was stopped by multiple people. This is when we start hurting badly. We can attempt to go for another combo if we still have the resources (a hand and/or permanents on the field). Otherwise, Breya beats will be our plan until we win or lose. It’s bad to say our late game is terrible, but when you’re an all-in combo deck, it’s usually all or nothing, and at times it is going to be nothing. I would like to reiterate, however, that with the way the deck is built, we should never get to this point in the game and shouldn’t have to worry about it too much. Just keep it in the back of your mind the possibility is always there.
Weaknesses of Breya
While I'm sure many people like to think their deck is top notch and has answers for everything, the truth is no matter what the deck is, there will be weaknesses and people will exploit them. In testing, I have discovered Breya has the following weaknesses:
1) Artifact Hate: Being an artifact deck is really tough. There is a ton of removal in the format whether it's things like Creeping Corrosion and Vandalblast or something more permanent like Return to Dust and Merciless Eviction. Which brings me to the next weakness.
2) Too Glass Cannon-y: This deck wins by combos. All-in combos to be exact. If our Bomberman combo gets disrupted, we will be left without a hand. If we get disrupted while going for our Doomsday win, we will also lose. We must know when it is safe to combo off, or have protection, otherwise we will lose and lose hard.
3) Creature-Based Strategies: We run very little creature removal. In fact, the only piece we have for dealing with mass creatures is Cyclonic Rift, and it will only help us for so long. We should hurry and find our combo pieces and win before we get overwhelmed by creatures, and sometimes things just don't work out in our favor.
4) Graveyard Hate: Some of our win conditions are graveyard based. If our graveyard becomes unusable via cards like Rest in Peace or Leyline of the Void, then we only have one way to win. If they use something like Tormod's Crypt or Surgical Extraction while we are attempting to combo off, we will be left without a hand or permanents.
5) Counters: Of course every deck is weak to counter spells. Being a combo deck means we are trying to get to our combo pieces as quickly as possible to combo off. Sometimes our tutors will get countered, or a vital piece to our combo gets countered, and when that happens, our game plan can fold.
Combos
While Doomsday itself isn't a combo, it does help facilitate our LabMan wins. However, we do have a couple of actual combos that help us win, and they are as follows:


Auriok Salvagers + Lion's Eye Diamond: The Bomberman combo! This is an infinite mana combo. With Salvagers in play, either cast LED, or bring it back with his ability. Activate LED, generating white mana. Activate Salvagers ability for 1W to bring LED back to hand, netting you a single W. Repeat this to generate infinite W to activate Salvager's ability, then continuing to generate your other three colors infinitely. Cast and activate Breya infinitely for the win.
Isochron Scepter, Dramatic Reversal, Aetherflux Reservoir, + mana rocks that produce at least 2: Activate Scepter using mana rocks which will create a copy of Dramatic Reversal, it will trigger Reservoir's life gain ability, and then when Reversal resolves, it will untap Scepter and the rocks. Repeat this process to gain infinite life to one-shot each opponent and win the game. You can also have Mox Opal or Mox Diamond in place of Reservoir in order to help create infinite colored mana, and then use Breya to facilitate your combo win.


Doomsday Piles
Doomsday is probably one of the most complicated cards to play in the game. Knowing which cards go into a pile, and the order they go in, can make your head hurt. This section will go over some of the MANY different ways to build your piles. Please note that I did not create this list of piles, and I used a list located here to compile these. These piles also follow the same format: the first card in the list will be the top card of the pile, and the last will be the bottom card. If you wish to combo off the turn you cast Doomsday, you will have to have a cantrip in hand to start the process. Otherwise, you will start on your next turn. Here are some examples of our Doomsday Piles:
Frantic Pile:
- Frantic Search
- Laboratory Maniac
- Thought Scour
- Anything
- Anything
If you have Sensei's Divining Top on the field, you can also do another pile that goes like this:
Activate SDT, drawing a card and putting Top as your first card in the pile. Cast Scour, binning SDT and the random, and drawing Frantic. Cast Frantic, drawing LabMan and Probe, discarding two cards, and untapping three lands. Cast Probe and with LabMan's replacement effect, you win the game.
Gush Pile:
Cast Gush by returning 2 Islands and draw into Probe and LED. Cast LED. Cast Probe, hold priority and crack LED for BBB. Draw Will off Probe and cast from the floating mana. Cast LED and crack for UUU. Cast Probe and draw Maniac. Cast Maniac from the floating mana, and cast one more cantrip for the win.Predict Pile:
Cast Predict and name LabMan. He will get milled, and then you draw into LED and Probe. Cast LED. Cast Probe, hold priority and crack LED for BBB. Draw Will off Probe and cast from the floating mana. Cast LED, crack for UUU and play LabMan. Cast Probe for the win.Protection Pile:
Cast Gush by returning 2 Islands and draw into Pact of Negation and Frantic Search. Cast Frantic Search and draw Probe and Maniac, and discard any two that are not LabMan, Pact, or Probe. Untap three lands and cast LabMan followed by Probe for the win.Grave Hate Pile:
Cast Gush by returning 2 Islands and draw into LED and Whisper. Cast LED. Cast Whisper, hold priority and crack LED for UUU. Draw into LabMan and Probe. Cast LabMan off of the floating mana, followed by Probe for the win.Turn 1 Doomsday Win Pile:
The following cards need to ALL be in your opening hand:
- Underground Sea or another black source
- Dark Ritual
- Doomsday
- Lion's Eye Diamond
- Gitaxian Probe
Cast LED. Cast Probe, hold priority, crack LED for BBB, and draw Whisper. Cast Whisper and draw Ritual and Will with B left in pool. Cast Ritual followed by Will. Replay LED, crack for BBB, replay Ritual and have BBBBB in your pool. Replay Whisper and draw into Petal and LabMan with BBB left in pool. Cast Petal, crack for U, cast LabMan, and follow up by replaying Probe for the win.

Notable Exclusions
There are plenty of cards that could go into Breya, but unfortunately, there isn't enough room. These are the cards that didn't make the cut.
There are many other cards that can be included but aren't, and it would take a lot of typing to explain every single one of them. If you are curious as to why a certain card isn't in here, ask and I will be happy to explain!Sharuum Combo Pieces:
- Sharuum the Hegemon, Sculpting Steel, Phyrexian Metamorph, Bitter Ordeal, Disciple of the Vault, Marionette Master, Altar of the Brood: While these pieces can find a home in Breya, ultimately I feel they are better suited for when Sharuum is your commander.
Infinite Combos:
- Nim Deathmantle/Eldrazi Displacer + Krark-Clan Ironworks: This was previously the go-to infinite mana combo of the deck. Deathmantle was the graveyard-reliant combo, while Displacer could achieve the same effect without relying on the graveyard.
- Metalworker + Staff of Domination: While Staff can be good in the deck itself, Metalworker relies heavily on having enough artifacts in hand to go infinite. With our curve being so low, and the chances of having any remaining artifacts in hand our hand, this isn't an ideal combo to have in this specific build of the deck.
- Thopter Assembly + Time Sieve: We really don't want to be sacrificing other artifacts to take an extra turn, so in order for this combo to happen, Assembly needs to stay alive until your next turn, but if people see that's what is coming, they will destroy one or both of them. This is too slow of a combo to include.
- Grand Architect + Pili-Pala: Another infinite mana combo. This combo is also too slow since we have to have Pili-Pala under our control since the beginning of our upkeep or have a haste enabler in order to untap it.
- Saheeli Rai + Liquimetal Coating: This is another combo in which you want to utilize Bitter Ordeal, Disciple of the Vault, Marionette Master, and/or Altar of the Brood in order to win. Since we don't run any of those four, there is no point in running these two.
- Thopter Foundry + Sword of the Meek: With infinite mana, we can create infinite tokens and gain infinite life. Breya already does this, and at a much faster rate, so this combo isn't needed in here, and its slots can be used for something else.
Changelog
12/1/16:
OUT:
Exotic Orchard
Sacred Foundry
Path to Exile
Artificer's Intuition
Pili-Pala
Grand Architect
Saheeli Rai
Clock of Omens
Utter End
IN:
Pact of Negation
Imperial Seal
Arcane Denial
Intuition
Toxic Deluge
Ad Nauseam
Future Sight
Gilded Lotus
Tezzeret the Seeker
I took out the lands as our curve ends at 5, and with the amount of mana rocks that are ran, it shouldn't be too difficult to get the mana that is needed. Grand Architect/Pili-Pala are cut as they are too slow to produce infinite mana, and are easy to remove. Took out PtE/Utter End as the former has a drawback of ramping our opponents and the latter is too high costed for removal. Intuition only fetches out a select few artifacts, so it isn't the best option to run. Saheeli Rai doesn't necessarily fit in here as we don't run many things to copy. Clock is cut to make room for other things, and isn't necessary to effectively run Winter Orb.
Added in Pact/Denial for more low-cost counters. Imperial Seal/Intuition/Tezzeret as more tutors. Toxic Deluge as another sweeper to help control the board. Gilded Lotus as another mana rock to produce through a Winter Orb. Future Sight to help dig through our deck, and combos with SDT and Etherium Sculptor. Ad Nauseam is another effective draw spell, and with having a small curve, should be able to get enough cards in hand to be able to combo off.
========================================
12/15/16:
OUT:
Etherium Sculptor
Future Sight
IN:
Dark Confidant
Lim-Dul's Vault
Etherium Sculptor really wasn't doing very much for the deck. The discount was negligible and often unneeded. Future Sight was barely every played, and I feel like there are better ways to be able to go through your deck to get what is needed.
Dark Confidant will be a fine inclusion, as it will let us dig deeper into our decks at the cost of a little life. Our curve is low (and now a bit lower) so the loss of life won't hurt us badly. Lim-Dul's Vault is the best way to dig through your deck and find what you need. It's cheaper to play than Future Sight, and can also set up the next few draws as well.
========================================
1/3/17:
OUT:
Academy Ruins
Arcane Denial
Azorius Signet
Basalt Monolith
Chromatic Lantern
Daretti, Scrap Savant
Dimir Signet
Eldrazi Displacer
Fabricate
Fact or Fiction
Gilded Lotus
Goblin Welder
Inventors' Fair
Izzet Signet
Krark-Clan Ironworks
Mox Opal
Muddle the Mixture
Nim Deathmantle
Reshape
Rings of Brighthearth
Scrap Mastery
Seat of the Synod
Skullclamp
Tezzeret the Seeker
Thirst for Knowledge
Trading Post
Transmute Artifact
Vindicate
Winter Orb
IN:
Ancient Tomb
Angel of Glory's Rise
Animate Dead
Buried Alive
Cabal Ritual
Chain of Vapor
Dance of the Dead
Dark Ritual
Dispel
Doomsday
Entomb
Grand Abolisher
Impulse
Jace, Vryn's Prodigy
Merchant Scroll
Mystic Remora
Notion Thief
Reanimate
Recruiter of the Guard
Snapcaster Mage
Tainted Pact
Talisman of Dominance
Talisman of Progress
Talisman of Indulgence
Thought Scour
Wear // Tear
Urborg, Tomb of Yawgmoth
Winds of Change
Worldgorger Dragon
After playing the deck, I’ve realized that going for the Displacer/Deathmantle + KCI combo is really clunky and mana intensive. We still want infinite combos to be the way to go, so I added the Worldgorger dragon combo back in, as well as Doomsday to help get the combo pieces faster. I’ve dropped the Signets in favor of Talismans so we don’t need to leave mana open to use them. Notion Thief + Winds of Change or any other Wheel effect will empty out everyone else’s hands and help us dig even deeper for our combo or some sort of protection. Angel of Glory’s Rise was brought in to make a better Intuition pile if you have a reanimation spell in hand (bin Angel, Salvagers, and Trinket Mage in order to combo off). Lowered the curve significantly so Dark Confidant and Ad Nauseam doesn’t hurt as much.
========================================
1/5/17:
OUT:
Angel of Glory's Rise
Anguished Unmaking
Chaos Warp
Counterspell
Grim Monolith
Impulse
Lim-Dul's Vault
Negate
Recruiter of the Guard
Vandalblast
Winds of Change
IN:
Frantic Search
Gitaxian Probe
Izzet Charm
Laboratory Maniac
Mental Misstep
Mox Opal
Necromancy
Night's Whisper
Pull from Eternity
Silence
Thirst for Knowledge
Took out some more fluff to make room for LabMan combo and friends. Izzet Charm and Thirst for Knowledge digs us deeper into our deck, and can bin Worldgorger if we end up with him in our hand. Necromancy can let us combo off at end of turn if the need/opportunity arises. Pull from Eternity is really useful if one of our combo pieces happens to get exiled, or can be used in conjunction with Tainted Pact so we can flip past a combo piece and then bin it afterwards.
========================================
9/9/18:
OUT:
Animate Dead
Buried Alive
Dance of the Dead
Entomb
Intuition
Gemstone Caverns
Necromancy
Pull from Eternity
Reanimate
Snapcaster Mage
Talisman of Indulgence
Talisman of Progress
Toxic Deluge
Trinket Mage
Wear // Tear
Worldgorger Dragon
IN:
Aetherflux Reservoir
Angel's Grace
Counterspell
Demonic Consultation
Delay
Dimir Signet
Dramatic Reversal
Grim Monolith
Gush
Isochron Scepter
Lim-Dul's Vault
Predict
Pyroblast
Spell Pierce
Vandalblast
Winds of Change
Completed revamp of the deck. New primer written to show the change in focus of the deck, as well as updated the card choices to hopefully make the deck more consistent.
-
Apr 2, 2019
1
Jostin123 posted a message on Sharuum, Everyone's Favorite KittyMassive updates are coming...Posted in: Multiplayer Commander Decklists -
 Jul 16, 2018
2
Feyd_Ruin posted a message on Totally lost on merging my MTGS and Twitch accountFor anyone looking to do recover an old, unmerged MTGS account:Posted in: Community Discussion
Make sure you have a twitch account already. If not, you need to make one. After that, proceed to
https://curseweb.zendesk.com/hc/en-us/requests/new
What can we help you with today?
> Website Assistance
Email
>Your twitch account email
Subject
> Account Merge
Description
> Indicate that you need to merge your twitch account with your MTG Salvation account. List both your Twitch account name and your MTG Salvation account name. If your email is not the same for both, please note this and what each one is.
Which website do you need help with?
> MTG Salvation
What can we help you with?
> Account Assistance
> Curse / Twitch Merge
-
 Jul 12, 2017
9
WizardMN posted a message on The Color Identity rule is the biggest problem with CommanderI know there have been arguments to ease up on some color restrictions (hybrid being the most vocal) but this is the first I have seen about removing color identity restrictions altogether. If you have specific opinions on Hybrid or Phyrexian Mana, feel free to voice those in the appropriate threads. And "a lot of people" wanting those to change is a meaningless statement. A lot of people think these should remain the same. "A lot of people" want a lot of different things.Posted in: Commander Rules Discussion Forum
Anyway, overall, this seems like a terrible idea. This isn't a simple matter of a obscure rule that makes the format worse/better (whatever). This is the foundation of the format. This is complaining that a motorcycle is awesome but would be so much better with 4 wheels and a roof. If you want that, just drive a car.
"Color Identity matters" is what makes EDH a format. There isn't anything inherently wrong with doing what you want to do, but then it is not EDH. Feel free to create your own format ad play it among your friends, but I see no reason to petition for this change to made to the current EDH format. -
 Dec 5, 2016
2
Hunter posted a message on Pia's Revolution,Disallow,Battle at the Bridge,Dark IntimationsSame sourcePosted in: The Rumor Mill -
 Oct 26, 2016
1
axelsior posted a message on Sharuum, Everyone's Favorite KittyShe'll very much be a different deck. For me, Engine Sharuum is what I've enjoyed, but I've always wanted to add red to it. I think I might transition from a purely competitive Sharuum deck to a more casual, but still combo-tastic Breya build, pulling some combos and synergies from Sharuum.Posted in: Multiplayer Commander Decklists -
Oct 17, 2016
2
tetravirulence posted a message on Sharuum, Everyone's Favorite KittyPosted in: Multiplayer Commander DecklistsQuote from kaolbrec »The Mesmeric Orb combo list is an interesting idea (his tappedout is here http://tappedout.net/mtg-decks/mesmeruum/).
When I first read the post, I'll admit I was a bit confused. It's a lot of extra pieces, some of which don't seem to do much on their own.
However, while talking to myself last night I realised what I was missing - it bins all the pieces at once. So as long as you have the mana, you're guaranteed to be able to go off that turn (assuming your opponents don't interfere also).
Of course, you're assuming then that you can get Mesmeric Orb and Basalt Monolith into play, and if you've managed that.. Well, why couldn't you have put Blasting Station in play and Sculpting Steel in the bin? We don't have a T&N for two artifacts so we've had to cast two tutors in either case.
And between those two scenarios, the Mesmeric Orb option will then cost you a further 6 for Sharuum, 3 for Ghostly Flicker, 1 for Cloudshift. Whereas the traditional route will cost 6 for Sharuum. Granted, you're guaranteed 3 mana from Basalt so perhaps we can say you need to have found 7 vs 6 mana by the time you combo.
Cards like Ghostly Flicker are ok without the combo, but don't work from the yard without Torrential Gearhulk, which is why we ran Unburial Rites. Monolith is very meh, except with Voltaic Key, Clock of Omens or maybe Power Artifact/Rings. Mesmeric Orb could do well just as disruption (t1 Altar of the Brood tends to need playing around and so would Orb).
My only other thought on this is that you might be able to justify cutting Ad Nauseam.. I know, it costs less, it's one card, it's instant speed, yadda yadda yadda.. But I miss running the curve-toppers. The All is Dust, the Ugin/Karn. They hurt with AN, but Mesmeric Orb doesn't care. Heck, little things hurt with AN. Time Spiral, Memory Jar, Karn Silver-Golem, if anyone still runs him.. Gilded Lotus, Thran Dynamo even. And honestly, I've felt like I've been missing mana rocks since I swapped to the eggs list - or at least, mana rocks that stick around. The whole ramp element is gone, I don't become a big scary deck late-game, so if the combo gets denied I'm pretty screwed because BUG has just been spewing lands everywhere.
Intuition piles involving Panharmonicon are still something I need to play to get a feel for whether that card is good enough before really looking at this seriously, but I think it merits a closer look. I've racked my brains trying to think if we can replace the flickers with artifact-based flicker, but you need two, and can't get two without Torrential into Ghostly, from what I see..
This combo is significantly cheaper and is not meant to replace the Sharuum combo but to work as an alternate to the Sharuum combo that costs less and wins the game on the spot. The deck works like the more common eggs list that generates 15-30+ mana while drawing 20+ card chunks of the deck in the same turn. You can just as easily play the main Sharuum combo here if you draw into it, or go full Four Horsemen. It doesn't matter. The idea is to win fast but more flexibly than the current Sharuum fast-combo lists, and with added marginal control elements.
Let me explain my thought process : Sharuum has always been an optimization puzzle. We will use Altar in this example because it is the cheapest and best wincon, and we will make some assumptions.
- Clone in hand + Altar in hand = 3WUB + 3 + 1 = 10
- Clone in hand + Altar in graveyard = 3WUB + 3 = 9
- Clone in graveyard + Altar in hand = 3WUB + 1 = 7
Compare that to these scenarios (assuming Monolith is untapped):
- Basalt Monolith in hand + Mesmeric Orb in Hand = 3WUB + 2 = 8
- Basalt Monolith in hand + Mesmeric Orb on field = 3WUB = 6
- Basalt Monolith on field + Mesmeric Orb in Hand = 2WUB = 5
- Basalt Monolith on field + Mesmeric Orb on field = WUB = 3
That isn't accounting for several other scenarios where we use Basalt Monolith to pay for Orb, or we have cost reducers, or we have other cards in play that may reset or untap Monolith (Voltaic Key, Dramatic Reversal, Ghostly Flicker, Hurkyl's Recall working in tandem with other effects, etc.) The normal scenarios all result in a lower converted manacost to combo-kill.
A side note: Labman version with Orb combo takes at minimum 4 mana to win with 3W for Unburial Rites but could take more depending on the draw spell cast..
Like you mentioned, Orb eats topdeck tutors and we can play around it. This severely hurts several other 'competitive' lists. Binning our own cards is irrelevant here. We have ways to recur, flicker, and sacrifice Sharuum to get whatever we want back. It is a very usable piece of disruption and has proven its worth so far for me. Ghostly Flicker is a minor utility piece on its own and has been useful in hand when resetting any rocks that generate >3 mana. I had one corner case where I used it on a rock and Sharuum, grabbed the loop, and dropped a Bitter Ordeal from hand.
I admit Cloudshift is pretty bad except when dropped on cards like Sharuum, Gearhulk, an opposing Zur that couldn't find Doomsday (at beginning of combat, of course), or any Voltroning list. These cases should rarely ever happen, but do keep in mind several other of the 'top' combo decks run 1-2 cards that are useless outside the turn they win the game. The list also isn't finished, so I'm hoping to improve this aspect -- there aren't many better options for this particular combo. There is a bad flashback-capable flicker effect, but at that point just run Labman combo. If only Gearhulk could hit Yawgwin...
In no circumstances would I ever cut Ad Nauseam for curve toppers or (relatively) bad rocks like Gilded Lotus. There's a reason our average CMC is hovering around 2.00. I wouldn't run Blasting Station anymore either, but it is an option if you are playing against the very few 'competitive' lists that still run Eldrazi. - To post a comment, please login or register a new account.

1
1
I disagree. It is not bad deckbuilding to play All Is Dust. This is a very powerful boardwipe almost one-sided. The card has its place in Tier 2 decks.
I agree with the fact that if you want to play Tier 1 competitive EDH, you need Ad Nauseam, and thus All Is Dust seems dangerous to play into your deck. But not everybody want to play fast-combos that kill in 1 or 3 turns. Myself I like longer games, thus I still play the Engine Sharuum. And All Is Dust is an All-star here.
1
Im a judge and I confirm this statement. You choose the order because they are two different triggered abilities triggering at the same time.
1
702.34a Madness is a keyword that represents two abilities. The first is a static ability that functions while the card with madness is in a player’s hand. The second is a triggered ability that functions when the first ability is applied. “Madness [cost]” means “If a player would discard this card, that player discards it, but may exile it instead of putting it into his or her graveyard” and “When this card is exiled this way, its owner may cast it by paying [cost] rather than paying its mana cost. If that player doesn’t, he or she puts this card into his or her graveyard.”
1
I finally finished to compile into one place all information given by Jostin about his Sharuum engine version.
This can be found here primer-edh-sharuum-engine-jostin-version on TappedOut.
It is like a primer, but I have no credits. All go to Jostin123.
I made this think because I believe that all those precious explanations he writes should be easily accessible.
In future, I will try to add more information from this thread, but I need first to read the whole 60 pages of posts
We have valuable discussion here, but they are too much diluted inside this big thread, while the first page stay un-updated.
1
We have also a group playing this kind of variant in Brussels (Belgium). We name it "Treachery".
Our group have a website mtgtreachery.forumactif.be where you can download some additional Comprehensive Rules and, mostly, card images.
Our variant is based from .Rai's Treachery (custom set) and from the boardgame BANG!.
I can confirm that this kind of variant allows multiplayer tables of 5, 6 and even more, without increasing the playtime that much. Other advantages are bigger and deeper diplomatics pourparlers between players. The EDH format is better with this !
We are developping and beta testing since one year, and now people in our gamestore want to play EDH only with this variant.
insertcleverphrasehere: may I use some of your ideas to insert them in our "Treachery" ?
1
See here: http://www.mtgsalvation.com/forums/magic-fundamentals/magic-rulings/251940-cardtag-explanation-aka-you-must-use-cardtags-in
1
3
1
I have a Vorel EDH who will love this little guy. But I wish we had some interaction to abuse him with Sharuum.