Hello and welcome to this week's Treasure Cruisin'! Today I want to break down one of the most powerful and arguably the marquee budget deck for any format: mono red Burn. Burn is a strategy that inhabits a unique space of power and relatively low cost. In almost every format—from many Standard seasons to Legacy and ever so slightly in Vintage—Burn is widely regarded as the go-to starting point. It is an easy archetype to understand and potent in the hands of a new player, but it takes years of dedication to master. Burn combines many aspects of playing Magic competitively, and achieving mastery illustrates that one knows the ins and outs of mulliganing, proper sequencing, and combat math. While the best Burn decks in Modern are typically Naya colors with a strong Boros base, mono red is an excellent starting point and easy to upgrade. If you want to win hard and fast, enjoy complex decision making, and have less than US$100 to spend, look no further than Mono Red Burn!
| Monored BurnMagic OnlineOCTGN2ApprenticeBuy These Cards | ||
|---|---|---|
|
Creatures 4 Monastery Swiftspear 4 Keldon Marauders 4 Hellspark Elemental Instants 4 Lightning Bolt 4 Shard Volley 4 Magma Jet 4 Searing Blaze 4 Skullcrack | Sorceries 4 Lava Spike 4 Rift Bolt Lands 2 Ramunap Ruins 18 Mountain | Sideboard 3 Tormod's Crypt 3 Searing Blood 3 Smash to Smithereens 2 Flames of the Blood Hand 4 Leyline of Punishment |
The basic idea behind Burn is to hurl as many spells as possible at our opponent's face and get their life total from twenty to zero in a few turns. Understanding the cards in the deck, and why we do not play other cards in their stead, is essential to playing the deck. While it is easy to run some cards over the others listed here, the pilot must be aware of what they are trading off and receiving in the process. That is not to say this list is perfect—far from it. Mono red does tend to homogenize itself, but there is still wiggle room with card choices and a bounty of other cards that certainly make the cut if we choose to run them. These will be discussed later, along with an explanation of what we stand to gain and lose by prioritizing them over other cards.
I will also discuss sequencing as we go along. Any experienced Burn pilot would tell us that sequencing is one of the most important ideas to understand while playing the deck. If we can maximize the amount of spells we cast with our mana, we will enjoy swift victory. Due to the aspect of sequencing, many players begin to see Burn with a different light. It is easy to categorize Burn as an aggro deck; it is trying to kill the opponent as fast as possible with creatures supported by spells that deal damage to the opponent. What many players fail to see is that, in reality, Burn is a combo deck. It wants to cast a set number of spells that deal damage in sets of three. In formats with fetchlands, Burn generally wants to cast six three-damage spells to kill an opponent who has taken two damage from fetching. When evaluating whether to mulligan, it is not simply a matter of spells versus lands, but also a question of how much damage the hand can deal and what we need to draw to close out the game.
The Kindling
To begin the deck breakdown, I want to discuss the premier characteristic of the deck: our twelve "Lightning Bolts." We run full playsets of Lava Spike, Rift Bolt, Shard Volley, and of course, Lightning Bolt. Each of these cards are three damage for one mana, and playing a critical mass of these effects guarantees redundancy and efficiency when used correctly. Each one is nuanced in some way, and understanding this is a core part of playing Burn. Lightning Bolt is the most basic of these effects. It has no drawback and can be cast at instant speed. It is excellent at any point in the game and does not necessarily need to be cast before or after any other spell. Lightning Bolt has survived for twenty-five years in Magic, with good reason. It is easily the most powerful spell in our deck, and the gold standard for any other burn spell. When evaluating other spells, we must ask the question, "How does this compare to Lightning Bolt's efficiency? Is the spell providing an extra benefit that makes a higher converted mana cost or less damage passable?" If the answer is, "No," it may not be the right spell for the deck.
Don't shout your incantations too loud—the echo
might cast something right back.
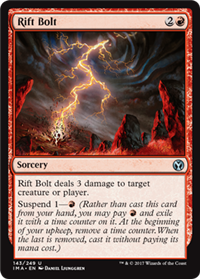
To illustrate this point, we can compare Lava Spike, Rift Bolt, and Shard Volley to Lightning Bolt. Lava Spike is essentially Lightning Bolt at sorcery speed. It is exceptionally rare for us to sling a Bolt at a creature, making Lava Spike's downside negligible. However, it is important to note that Lava Spike is a sorcery—we have to spend mana on our turn to cast it rather than holding it on our opponent's turn for maximum effectiveness. This makes Lava Spike one of the first cards we play in the game. By using it early, we are free to utilize our mana efficiently on later turns to give us flexibility. This is important considering we play cards like Searing Blaze and Searing Blood, both of which will be discussed later. In a similar vein, Rift Bolt is a Lightning Bolt on layaway. We can suspend it on one turn to get damage on our upkeep; this gives us a few interactions that are rather interesting. For starters, we do not target upon suspending Rift Bolt, only when we cast it on out upkeep. This means if our opponent casts a creature that we must kill, we can do so. Secondly, it gives us a cheap way to get a prowess trigger off of Monastery Swiftspear one turn later, which can be clever when combined with our other instants. The most interesting, however, is the fact that Rift Bolt costs three mana, despite only costing a single red to suspend. Regardless if we suspend Rift Bolt, Chalice of the Void checks for converted mana cost, and thus a Chalice on one—the most devastating setting for us—cannot counter Rift Bolt. Both Lava Spike and Rift Bolt are cards that we want to cast first if possible due to them being cheap sorceries that will allow us to cast more spells later.
On the other end of this spectrum is Shard Volley, a card we ideally cast as the finishing blow to our opponent. Volley is exactly Lightning Bolt with the steep added cost of sacrificing a land. We only play twenty lands, so we typically will have two to four lands in play at a time. Sacrificing a land can be detrimental and will cost us the game if timed incorrectly. However, if we wait until our opponent will either die to a resolved Volley or will die very quickly after casting it, the missing land will never effect us. This is a prime example of how sequencing is important; we generally want to throw our sorceries first and use Shard Volley as the final burn spell. To recap, using Lava Spike and Rift Bolt before anything else allows us to hold up burn as removal if we must and respond to game-ending spells. Similarly, Shard Volley should be cast last if we can help it so we don't lose due to sacrificing a land. All of these spells deal three damage for one mana, but that does not mean these are all Lightning Bolt. They each have their nuances, and understanding them is critical to playing the deck.
Secondary Burn
Our next category is secondary burn. These spells are not as powerful as our Lightning Bolts, but they are necessary to fill out the deck and give us as much burn as possible. The first of these is Searing Blaze. We can pick off a creature and deal damage to our opponent for two mana, a powerful ability when combined with our creature suite. However, it has the issue of variance; if we miss the landfall trigger, we can only remove small creatures and ping our opponent for a single point of damage. While there are plenty of targets that die to a Searing Blaze without landfall—Snapcaster Mage, almost the entirety of Affinity, Counters Company's various manadorks—the three damage from hitting landfall pushes us to remove larger blockers. Additionally, one must remember that Searing Blaze needs a targetable creature to deal damage to our opponent. If our opponent does not control any creatures, Searing Blaze is a dead card. That being said, Searing Blaze pulls double duty as burn and removal, which means we do not need to spend a burn spell on a troublesome creature without advancing our game plan: killing our opponent as fast as possible. It is a solid inclusion in our deck, and a little variance is well worth the utility this card provides.
Skullcrack is a two mana Lava Spike with upside. The upgrade to instant speed gives us the drop on our opponent if they try to gain life, and shutting that off for a turn can be all that we need to win. Even when lifegain effects are not present in a given matchup, Skullcrack can stil deal the magic number of three damage to our opponent. It is an excellent example of our cards having extra utility. Searing Blaze doubles as a burn spell because it requires a creature to target, but Skullcrack will always burn our opponent and has the potential to shut down an opponent's sideboard plan for two mana. As such, it is important to cast this card at the correct time if we think our opponent will gain life somehow to keep themselves alive. If it is a trigger from casting spells, such as Kor Firewalker or Dragon's Claw, it would be wise to cast Skullcrack first, and then hurl a flurry of burn spells in the same turn to close out the game. If we are playing around instant speed lifegain—Blessed Alliance and Feed the Clan—cast the spell that would kill our opponent first, wait for them to cast their lifegain spell, and then respond with Skullcrack. This either forces them to have another lifegain effect or another way to stop Skullcrack, such as a counterspell. In order for these plan to work properly, we must understand what deck our opponent is playing and deduce what could be going on in their hand and on the board. In situations like these, Skullcrack demands a certain amount of play experience and skill to know when to use it. Not every gamestate is the same, and thus we must use our own judgment when deciding the order to play our spells in. Other times, we can just throw it at our opponent because we know their deck does not have lifegain in their 75.
No, no, not the face, NOT THE FACE!
Lastly, we have a full playset of Magma Jet. At face value, two damage for two mana is too slow for our deck when compared to our package of Lightning Bolts. However, the most important aspect of this card is the scry. There are no cards in our deck that draw cards—we are at the mercy of the top card of our library. Magma Jet gives us a way to manipulate what we draw next while simultaneously dealing damage to our opponent. It allows us to to get the exact number of lands we need and move chaff to the bottom of our deck. In a Burn deck, we need to draw as many spells as possible. Drawing too many lands instead of spells can be the difference between victory and defeat, and Magma Jet helps to mitigate this. In reality, Magma Jet is one of the more powerful spells in our deck because it aides us in drawing more burn spells more often.
Creatures
Finally, we have three playsets of creatures. Each of these are repeatable sources of damage, a necessary component of any Burn deck. All of our burn spells can only deal damage once before going to the graveyard, which means we have to draw more burn to deal more damage. Playing creatures gives us a consistent way of dealing damage without relying on good topdecks. Mono red Burn decks like ours need some form of repeatable damage due to the lack of cards like Boros Charm and Lightning Helix, both of which give Boros and Naya Burn extra reach and can keep them alive one more turn to find the last card they need. In mono red, the creatures must hit hard and fast because we have no way of getting around powerful sideboard cards like Kor Firewalker and Leyline of Sanctity.
Our first creature is Monastery Swiftspear. While a 1/2 with haste is nothing special, prowess makes her a powerhouse. She functionally boosts all of our spells to hit for one extra damage each, and she dominates combat when combined with our instants. In most cases, it is better to lead with a Swiftspear on the first turn of the game rather than waiting for our opponent's end step to throw a Lightning Bolt. However, there are times where the optimal play is to suspend a Rift Bolt on our first turn, and follow it up on the second turn with Taylor Swiftspear into another one-mana spell. These positions are typical for us, and we will shift our sequencing depending on the matchup. This is solved with skill and experience, and ultimately only the pilot can decide what they believe is the best play.
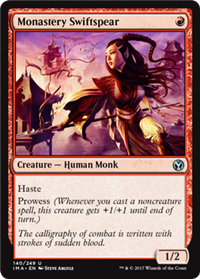
Any experienced Modern player knows Taylor Swiftspear is trouble when she walks in and will kill her on sight. It is as though they have bad blood with the quintessential red creature, which is not exactly mean: this card has never been innocent.
Monastery Swiftspear is our only one-mana creature, but our other creatures are well worth the extra cost. Keldon Marauders is a powerful two drop that gets ugly on an empty board. A two mana 3/3 is incredibly powerful in Modern, even with the drawback of vanishing. While we do want staying power in our deck, our creatures must also be large enough to end the game quickly even with a drawback. Thus, the Marauders are an easy inclusion and a staple of mono red Burn decks in Modern. When it enters or leaves play, the Marauders deals one damage to the opponent. This is an excellent ability to have on a creature in our deck because even if we cannot attack or it dies in combat, we still inflict a couple of points of damage in the process. If our opponent does not block or kill it, they take a whopping five damage—the best mana-to-damage rate in our deck! However, if they spend a removal spell on it, it is always at a disadvantage for them because Keldon Marauders would die soon anyway. If the Marauders trade with another creature in combat, we get two points of damage in addition to removing a creature. In this way, we must look at the Marauders not just as a creature, but a creature hybrid of Searing Blaze. Keldon Marauders will either slam our opponent for five damage or force them to spend a removal spell or creature dealing with it. At its absolute worst, it sits in play and vanishes. Even if we are on the back foot it is an excellent blocker, forcing a trade and dealing some damage simultaneously.
Our last creature also sacrifices itself but can be cast twice before truly being gone: Hellspark Elemental. This is simply a walking Lightning Bolt for two mana. It is an excellent followup play to any one mana spell in our deck. Additionally, it can force itself through chump blockers thanks to trample, which creates incredibly awkward blocking scenarios for our opponent. Even though we lose the Elemental on our end step, unearth can be backbreaking if the opponent is low on life or is forced to leave back blockers. Even worse is the thought of spending a removal spell on it, because it would sacrifice itself anyway. There is no greater feeling than watching an opponent expend their Path to Exile on a Hellspark Elemental to keep themselves alive one more turn. Furthermore, try not to forget that the angry thunderhead can return from the graveyard by activating its unearth ability. If we are drawing dead or the opponent is creatureless, check the graveyard to see if there is a surprise source of three damage. This is very useful to close out the game if the opponent forgot about unearth and certainly leads to some wins we otherwise would not receive. While it is dead on a board with a defending creature of toughness four or greater, we ideally play a Hellspark Elemental in the early game. This helps it attack before our opponent can play larger blockers and allows our spells to be used to finish off our opponent.
Manabase
Our manabase is very simple. Twenty lands, eighteen of which are Mountains, is about as easy as it comes. One of the reasons mono red Burn is strong comes from the manabase—it is painless. We have a competitive advantage over most decks; other decks hurt themselves with fetchlands and shocklands, while we typically only play basic lands. This means we can kill our opponent quickly without helping them do the same to us. The life we do not spend getting mana can be just enough to win us the game.
We do, however, play two copies of Ramunap Ruins. When I was testing the deck, I initially tried 18 Mountains as the only lands in the deck. It worked for the most part, but I found myself mana screwed a little too often. However, twenty Mountains felt like too many and I was drawing lands when I needed spells. I eventually settled on replacing two of the Mountains with a pair of Ramunap Ruins, and it was the perfect balance of burn and lands. Ruins gives us burn when we are mana flooded, which is a strong late game ability. While it is only two damage, and we have to sacrifice the Ruins because they are the only Deserts in the deck, it does give us a way to make our lands relevant when we need burn. The trade-off is that we chip into our competitive advantage of not taking damage from our manabase. When we do not have enough mana to activate Ruins, it is a painful Mountain. If we need another land to hasten our clock, the Ruins will ping us consistently. We can play the deck without them, but I found them to be more useful than just another Mountain. If desired, they can be cut to take full advantage of a painless manabase. I would recommend removing them if the metagame is very aggressive and the life we lose from Ruins matters. If there are slower midrange and control decks abound, Ramunap Ruins is an excellent inclusion.
Sideboard
As always, sideboards should be crafted to fight what is present in the metagame. Here is what I settled on in testing, and it is no more than a template. There are plenty of options for Burn, even in mono red, so it is important to form your sideboard wisely.
- Three Tormod's Crypts serve as graveyard hate. It is possible to skimp on this, but I elected to include it. It is a free card, so we can commit all of our mana to burn spells. Even something as small as Relic of Progenitus can take enough mana away from us to make us too slow. As such, I strongly recommend utilizing Crypt over any other graveyard hoser.
- A trio of Searing Blood gives us extra copies of Searing Blaze for matchups with small creatures, namely Counters Company. It is possible to swap these with Searing Blaze in the main board if one so chooses, but I never tried it personally; I value the potential extra damage to a creature over the guaranteed two from Searing Blood.
- Three copies of Smash to Smithereens grant us both artifact hate and damage, which gives it the leg up over red's bounty of artifact destruction. We are not a deck that needs to destroy artifacts as a board wipe, only as way of slowing down the opponent and the occasional sideboard card, like Dragon's Claw.
- A pair of Flames of the Blood Hand is both burn and lifegain hate. There are some lists that put two copies in the maindeck in addition to the two in the side, and I tested a version with it. It played well, but I ultimately cut it to make space for lands. It is a mainboardable card, but at most two copies. The three mana required to cast it will slow us down if we play too many because they will clog up our hand.
- Finally, a full playset of Leyline of Punishment thwart any lifegain strategies. Mono Red thrives at Friday Night Magic events, where strategies at the fringes of Modern can make an appearance. As such, strategies such as Soul Sisters and MartyProc are practically unwinnable, and anyone who manages to assemble an infinite loop with Kitchen Finks wins the game. We need to shut them down early, which requires having Leyline in out opening hand. While playing four copies means we can draw into it later, there are matchups where we must mulligan into it. If we draw a copy without having one in play, casting the Leyline can be reasonable play despite how expensive it is because in the matchups where we bring it in, we need it in order to win the game.
Upgrades and Adjustments
Mono red Burn is an easy deck to upgrade. This process can be done in steps with the end goal being to have a complete top-tier Burn list. As such, the first upgrade I would make is optimizing the creature package with playsets of Goblin Guide and Eidolon of the Great Revel. Both of these are powerful creatures, and Eidolon's ability to hurt the opponent when they cast a spell is incredible. It is possible to play Vexing Devil and Grim Lavamancer in a mono red list, but including them is a matter of personal choices rather than needing staples. If they make it into the deck, Devils should be a playset and Lavamancers should only be a two-of due to the lack of fetches to fuel its ability. I would remove some of the lower tier burn spells to make room for them, but remember that they are by no means staples of the archetype.
The next step is going for Boros Burn, and this is a costly upgrade. Adding white gives us powerful sideboard cards such as Rest in Peace, Kor Firewalker for the mirror match, and Deflecting Palm; along with some of the most powerful burn spells in the format: Lightning Helix and Boros Charm. This means acquiring red fetchlands, including a playset of Arid Mesa, along with some number of Sacred Foundry and four copies of Inspiring Vantage. It is possible to perform this upgrade on a budget with Inspiring Vantage and Battlefield Forge, but it is very fragile and much less consistent. Some lists also play a single Plains to fetch for against decks running Blood Moon. When making the shift to Boros colors, remove the Ramunap Ruins and enough Mountains to remain at 20 lands. Also remove some of the burn spells that do not cost one mana, namely Magma Jet. The multicolor spells added to the deck are far more powerful than the two drops in the mono red version, and as such we must keep our curve low and remove the old set of two mana burn for the new Boros package.
The final step is going to Naya, and it is not as expensive a leap as Boros Burn but still puts some pressure on the wallet. First, we may need more fetches like Wooded Foothills. I recommend picking these up when building towards Boros burn in order to save some money in the long run. The main reason to play Naya Burn is Destructive Revelry, a powerful sideboard card that destroys Leyline of Sanctity and Blood Moon, two cards that can absolutely destroy a three-colored Burn deck. To supplement this, a singleton Stomping Ground is a must. Some Naya lists no longer play Atarka's Command, so if we head down this route we only splash green for a clutch sideboard card. If we play Atarka's Command, we may want another green source. This bit requires testing adjusting the land ratios and even the amount of lands in the deck, as many Burn decks go down to 18 lands. I personally prefer 20, but this is a matter of what works best for the pilot.
For adjustments, there are several playable cards for Mono Red. Besides the aforementioned cards that can be used to upgrade the deck, Spark Elemental is yet another copy of Lightning Bolt and just as painful to deal with as Hellspark Elemental. Many lists play it over Monastery Swiftspear, but I opted to play the creature with staying power. Many top tier Burn lists now play Shrine of Burning Rage, which can give us a enough reach to obliterate a life total with one card. Bomat Courier only deals one damage per attack, but can refill our hand when we need it. My playtesting shows that maybe this type of effect is unnecessary, but it certainly is useful. In the sideboard, or even potentially in the maindeck, Blood Moon will just win games on its own because nobody will expect it from a Burn deck! It is not a trick I would use often at Friday Night Magic, however, as after some time players will guess that there is a Blood Moon waiting for them. If we need a one mana creature with two power, Tattermunge Maniac is usable, but is certainly outclassed by Taylor Swiftspear. These are just a few of the myriad viable red cards that fit into this deck, and I strongly recommend searching for cards that I may have missed. Improvement comes from trying something new, and perhaps the most powerful variation of this deck is yet to be discovered.
That brings us the end of this week's Treasure Cruisin'! What is your opinion of mono red Burn? This is easily one of the most powerful decks in this price range, and any player looking to buy into Modern on a budget has to try Burn at least once. The deck almost always has a chance against the top decks of the format. What suggestions do you have for players who want to play this deck? Was there something I missed? What decks do you want to see in the future? Let me know in the comments, and as always, I am open to answering anyone's questions, via either PM's or directly in the comments.
-
View User Profile
-
Send Message
Posted Sep 22, 2017Status quo for removal is that removal spell used, creature is gone. Disadvantage (for the removal player) is when that creature provides some form of edge on the removal, and advantage is when the removal is favored on the creature, such as none being used at all. What you described as using removal on a creature that is about to die anyways is still status quo, removal used, creature gone. The difference is within the creatures other effects, not the self-destruct.
-
View User Profile
-
Send Message
Posted Sep 15, 2017-
View User Profile
-
Send Message
Posted Sep 16, 2017-
View User Profile
-
Send Message
Posted Sep 14, 2017-
View User Profile
-
Send Message
Posted Sep 15, 2017-
View User Profile
-
Send Message
Posted Sep 13, 2017-
View User Profile
-
Send Message
Posted Sep 13, 2017-
View User Profile
-
Send Message
Posted Sep 13, 2017-
View User Profile
-
Send Message
Posted Sep 14, 2017-
View User Profile
-
Send Message
Posted Sep 16, 2017